How to View the List of Applications
- Go to Events > Management. Select the call you want to view from the Current Event drop-down list.
- Under Application Status, click on the name of a status or click the View All button.
- To locate a specific application, use the Search By box to search by name or application ID. You can also filter applications by category or status, and filter by tagged or flagged applications.
- Clicking on a status loads the table of applications. click any column heading to sort the list up or down.
- The table of applications will display one of two ways, depending on your jury type (Scoring by Application or Scoring by Art):
- If the call is Scoring by Application (Jury by Artist), each entry ID# = a body of artwork per artist.
- If the call is Scoring by Art (Jury by Artwork), each entry ID# = one artwork sample per artist. For example, if an artist submits 3 artwork samples, there will be 3 separate applications each with their own ID#.
- Click on an application’s APP ID# to view the artist application.
Hover over the blue (+) icons to view the details of each field:
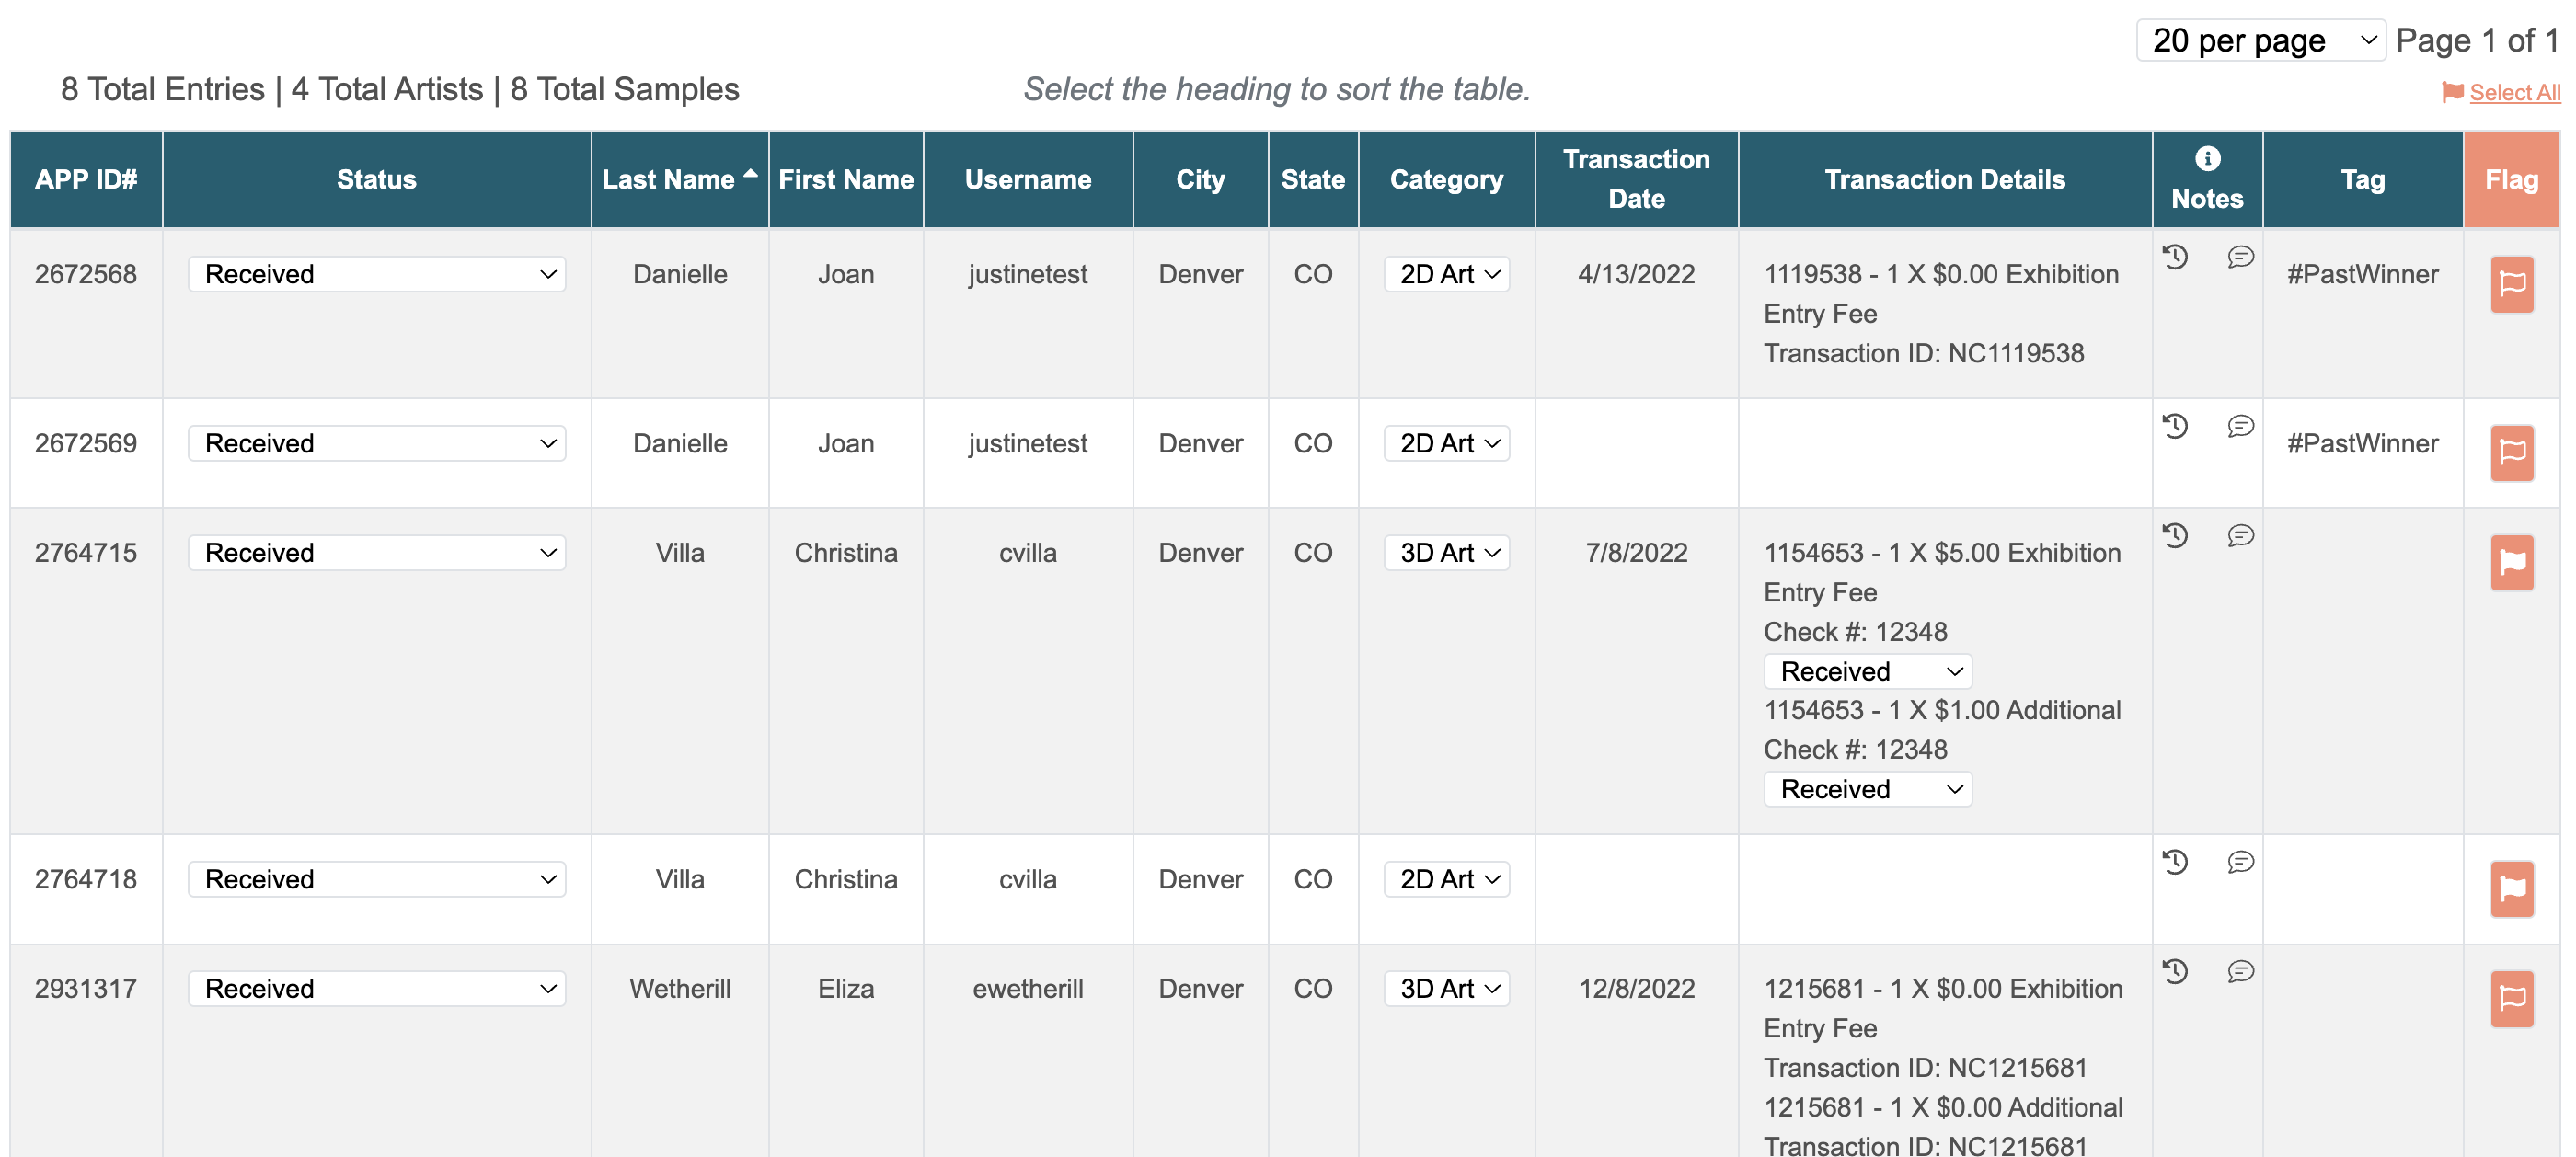
APP ID#: Unique application number assigned by CaFÉ. Click this number to see the artist’s application.
Status: Displays the current status of the application. To change the status, select a new one from the drop-down menu.
Last name, First name, Username, City, State: Displays profile information about the applicant. If an artist is a part of a team, it will be indicated in their artist application.
Category: Displays the category selected by the artist, if used. If you need to change the category, select from the drop-down menu.
Transaction Date: Date the application was submitted.
Transaction Details: Lists the cost and quantity of items purchased by the artist.
Status History: To view the status history for an application click the clock icon.
Comments: To Add a Comment, click the bubble icon. Comments are internal and cannot be seen by the applicant.
Tag: Displays tags created by the administrator.
Flag: Click the Flag icon to flag an application. For internal use only and cannot be seen by the applicant.
Learn more about downloading application information by visiting our Reports on CaFÉ help guide.
How to View an Individual Application
- Find the application in the Events > Management page.
- Click on the application’s APP ID# from the table of applications.
- View the applicant’s profile details in the Contact Information section. Click on the applicant’s email address to send an individual email.
- Notate the application in the Actions section.
Hover over the blue (+) icons to view the details of each field:
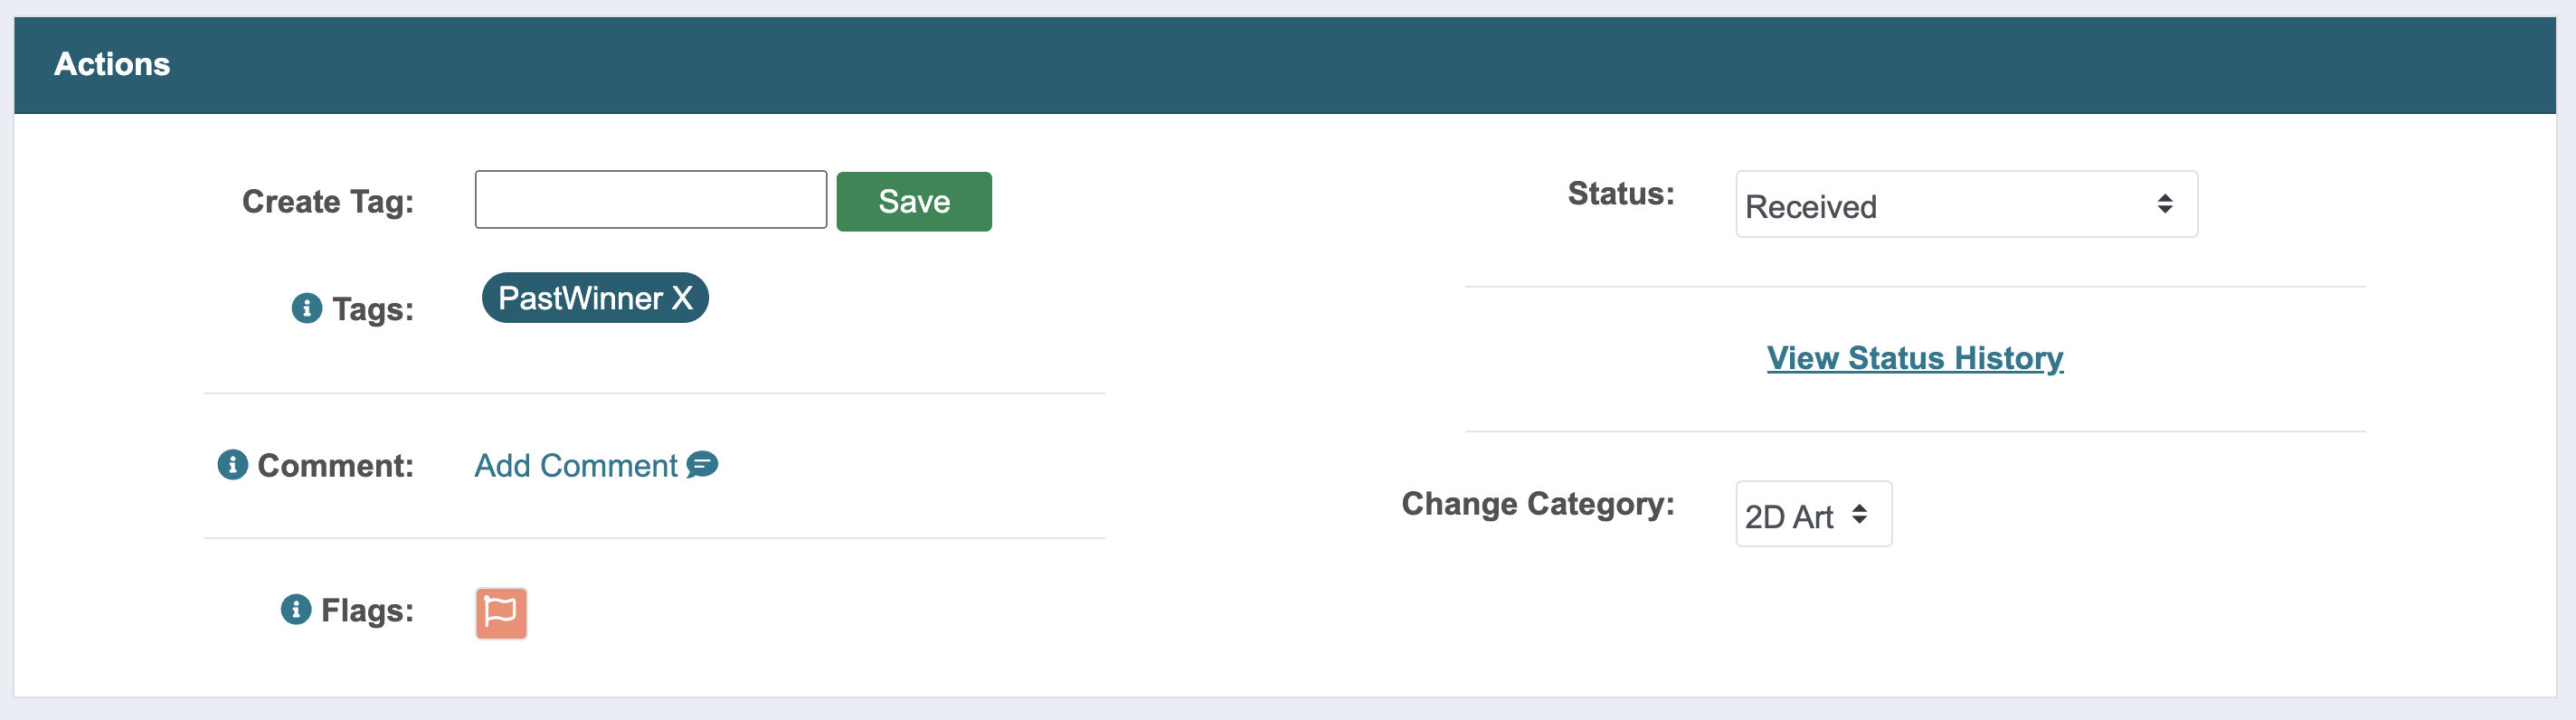
Tag: To add a tag, enter up to 12 characters next to Create Tag and click Save. Add up to three tags per application. Tags cannot be seen by the applicant but can be seen by the juror(s).
Comment: To add a comment, click Add Comment. Comments are internal and cannot be seen by the applicant.
Flag: To flag the application, click the Flag icon.
Status: Change the Status by updating the dropdown menu. Changes will be saved automatically.
View Status History: Click View Status History to view a record of the application’s status changes.
Category: Change the Category by updating the dropdown menu. Changes will be saved automatically.
- To add a tag, enter up to 12 characters next to Create Tag and click Save. Add up to three tags per application. Tags cannot be seen by the applicant but can be seen by the juror(s).
- View the applicant’s answers to your custom form questions in the Form Answers section.
- View artist statements and work samples in the Work Samples section. Click on the thumbnail to view the enlarged image and artwork details.
- View emails sent to the applicant in the Emails section. Click on View Email to view the message.
- View the transaction details in the Transaction section.
How to Change the Status of an Application
- Go to Events > Management > Choose Event
- Find the application by clicking on the status or using the Search By box.
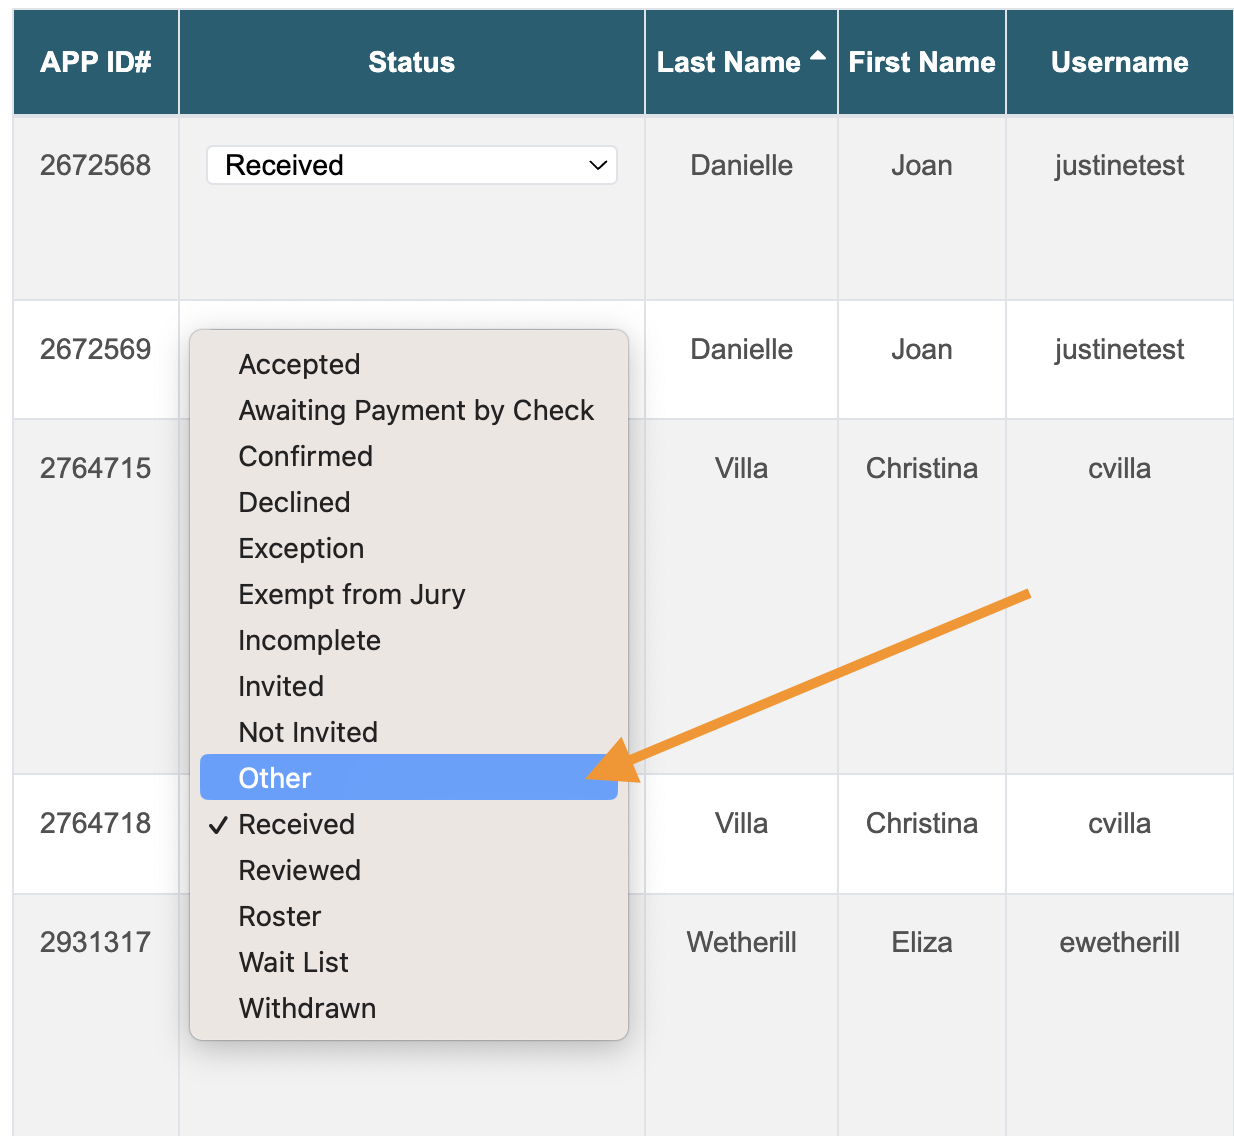
- On the table of applications, go to the Status column of the application you want to change.
- Select a new status from the drop-down list.
- Changes will be saved automatically and the application will be moved to its new status.
How to Change the Status of Multiple Applications
- Go to Events > Management > Choose Event
- Click on the status of the applications or use the filters in the Search By box to find the applications you want to change. You can use any combination of the search filters to narrow down the list of applications.
- At the bottom of the applications table, locate Change All Applications to [new status].
- Choose the new status from the drop-down menu.
- Click Change Status and the applications will be moved to the new status.

How to Allow Applicants to Edit/Modify an Application
- Find the application in the Events > Management page.
- Change the status of the application to either Incomplete or Exception, depending on your deadline date:
- To allow an artist to modify an application before the deadline date, change the application status to Incomplete. The application will automatically move back to the Received status when the artist resubmits.
- To allow an artist to modify an application after the deadline date, change the application status to Exception. You will have to manually move the application back to the Received status when the artist alerts you they are done with their changes.
How to Download Uploaded Attachments from Applicants
- Find the application in the Events > Management page.
- Click on the application’s APP ID# to view the artist application.
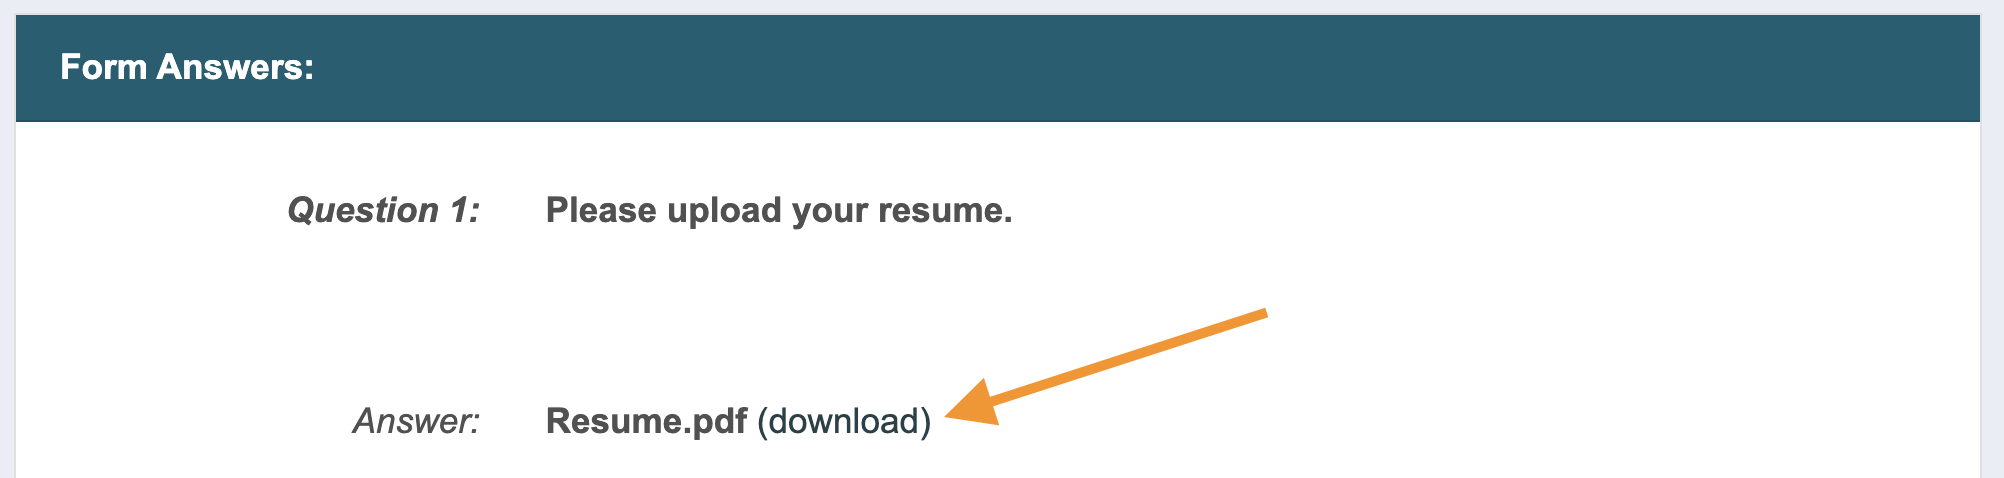
- Find the file attachment under the Form Answers section.
- Click (download). The file should begin downloading immediately.
Note: Uploaded attachments such as resumes must be downloaded one at a time per entry.
Learn more about the information collected via CaFÉ and how to manage applications by watching our Data Collection and Artist Management webinar.
Application Status Definitions
There are 15 statuses: Received, Invited, and Not Invited are the most commonly used. Invited and Not Invited are used to designate the final results of the jury.

Accepted
Interchangeable with the Invited status. Artists are more familiar with and often prefer the Invited status. Can also be used in tandem with the Confirmation Deadline feature—when the Invited artist accepts the invitation they are moved to the Accepted status.

Awaiting Payment by Check
Entries will move to this status if the applicant selected the “pay by check” option at checkout. When you receive a check from an applicant, change the applicant’s status to Received.

Confirmed
Use after your jury if you have set the Confirmation Deadline feature to active in the Call Editor. When the Invited artist pays the additional fee, they are moved to the Confirmed status.

Declined
Use when an applicant declines an invitation.

Exception
Use if a received application needs to be modified after the deadline. When the applicant finishes making changes, you must manually change their application status back to Received.

Exempt from Jury
Use if the application is exempt from the jury process.

Incomplete
Use if an artist needs to modify an application before the deadline. The applicant can then re-submit their application with changes.

Invited
Use after jurying to invite the applicant to participate and/or to indicate the artist has been selected as a finalist.

Not Invited
Use after jurying if the applicant is not invited to participate, has not been selected, and/or is not a finalist.

Other
Can be used as a general placeholder or to group specific artists together.

Received
Submitted applications appear in the Received status. Leave applications in this status to jury them.

Reviewed
Use to indicate when an entry has been reviewed.

Roster
Use to create a list of prequalified applicants. Allows the applicant to modify their active entries at any time until you move them to a different status. Used by roster calls only.

Wait List
Use after jurying if the applicant is on the waitlist.

Withdrawn
Use if the application has been withdrawn.
For an in-depth look into the application statuses, watch our Defining Application Statuses and Helpful Tips webinar!